Theatre of Blood
General Resources
Theatre of Blood (ToB) mechanics and best practices from the Infernal OSRS clan. Below you will find information about all bosses in the theater. Everyone doing ToB should know and perform most if not all of the things mentioned. Take your time to read and try them in entry mode. Questions: ask in the Discord or message directly.
Maiden — Bow flick
Maiden — Staying on tick
Maiden — Stacking
Maiden — Cross-freezing
Used during 70s/50s stack so N1 nylo gets in range of MDPS Dinh spec. SFRZ freezes N1, NFRZ freezes S1. Cross-freeze on all 3 nylo spawns in max eff teams; on 30s, SFRZ catches S4.
Maiden — Skipping
Kill maiden before 30s un-freeze and enter. All but guaranteed with power-creep. Dump any specs at that point if you haven't already.
Maiden — Full room example
ExampleBloat — Pre-firing
Attack Bloat with T-Bow or ZCB before he goes down the first time. Stand on the corner, wait for Bloat to walk 3 tiles towards the next side of the pillar. You will be dragged — yellow click or your character keeps running.
ExampleBloat — Necking
Bloat — Chally 4 Scy Chally
Bloat — Tick-eat Stomp
Click a tea when your screen shakes.
Bloat — SBS Stall
If Bloat is 1 swing from death and standing back up, SBS the stomp (same timing as tick eating) to stall damage and get one last attack in.
ExampleNylos — Wave guides
Nylos — Bow pipe bow
When the boss switches to ranged, if your bow attacks before the boss, you can fit a blowpipe shot between your two bow shots.
Nylos — Gear swaps
Sotetseg — Spec order
Sotetseg — Tanking venges
Turning off prayer to tank a venge increases DPS. Worth it if hp above 50 and you have hard food or p-neck. Be careful not to get stacked with disabled overheads. Use the maze to heal.
Sotetseg — Off on 3
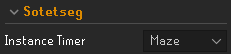
As the non-chosen, stepping off the maze on tick 3 of the instance timer lets you attack the boss instantly. In ToB QoL, set Instance Timer to "Maze".
ExampleXarpus — 5t Xarpus
First hit · Second hit · Third hit · Fourth to First · Full cycle
Xarpus — 22121
Verzik P1 — Sang pre-fire
You can fit a sang (or dawn spec) as your first attack from behind the pillar and still get 2 5t attacks on the boss before running back. Required for many P1 charts.
Sang pre-fireVerzik P1 — Chart
Many charts exist for fast P1s. Communicate with your group. 416 is bad — never use it. Learn to use a chart.
Verzik P2 — East Boak
ExampleVerzik P2 — West Boak
ExampleVerzik P2 — Red X SBS
On your 3rd attack in cycle (like Xarpus), ctrl-click (walk) an item on the floor and cast SBS at the same time to keep up death charge. Do it after your 3rd attack — you cannot 5t Verzik without risking a bounce.
ExampleVerzik P2 — 5t Reds
While attacking Verzik with reds alive, use the 4th attack in cycle (the rag hit) to attack a red crab instead. Keeps reds low hp and avoids missing an attack cycle.
ExampleVerzik P2 — 1d Reds
On first reds spawn, everyone attacks Verzik on first available tick. On next attack, everyone stays in range and risks being bounced. One person bounced while others get swings. After bounce, 1–2 more scythe swings then claw spec. RDPS and MDPS should have death charged purples and reds before this for 50% spec.
Verzik P3 — Simulator
Best way to practice tanking without nuking your team: Verzik simulator. Blue = meleed, green = correctly stepping under.
Verzik P3 — 1t Tanking
Pre-enrage only. After Verzik attacks, she snaps back to idle. On the snap, count to 3 and step under for 1 tick, then click her again. Prevents the boss from moving, important for P3 Boak.
1t TankVerzik P3 — Boak
ExampleVerzik P3 — Duck Tank
ExampleVerzik P3 — Pog Tank
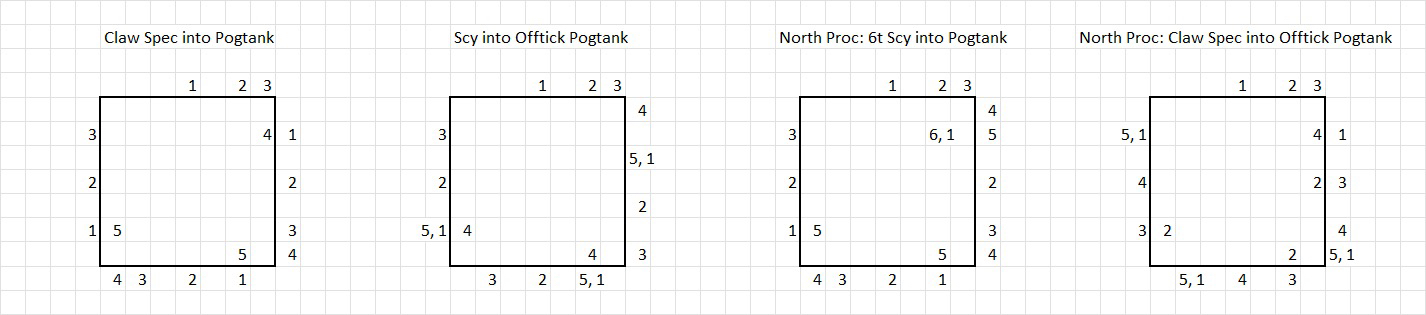
Like 1t tanking but click under Verzik on the animation snap instead of 3 ticks after. With a normal team you should proc tornadoes during webs; set up Pog tank with the chart.